Grey Frequencies photo's from Defcon 18
In 2008 I was in New York and walked into a Hot Topic (Stop laughing!) to just check out what was there for 'REPO: The Genetic Opera' swag. On thier clearance rack was this long black bondage 'coat' that was heavily reduced down to $40. The scary part about it was that it fit beautifully. My tall thin frame makes clothing shopping very difficult, so to find something that fit so well for cheap was amazing.
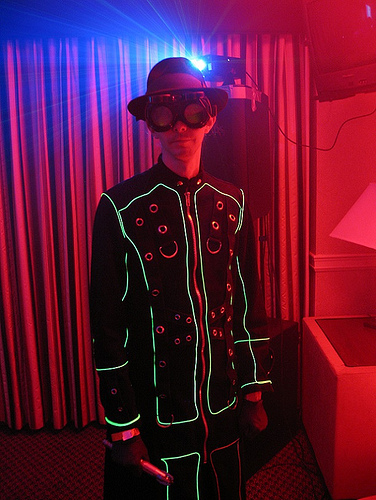
The coat immediatly screamed to me to be hacked in some way to add LED's or some other thing to make it Defcon party worthy. It took me a couple years, but I finally go around to it in June 2010 with some early planning long before.
I looked at LED's early on, perhaps mounted in the grommets or as 'spikes'. The Grommets are 13mm and so it would be tricky to mount 10mm LED's and other problems of how to route wiring made me look at Electroluminescent Wire. Diana Eng's work with EL enhanced fashion sealed the deal for me.
Electroluminescent Wire (EL wire) is really cool stuff. It lights up along it length in a variety of colors, is flexible, bright and (realativly) cheap (though at $1.20/ft that is arguable). The best part of the EL solution was that, following the seams of the coat, made some neat patterns that acted as accents, rather than as focal point.
The heart of the Coat is the EL Sequencer from Sparkfun Electronics. It is meant to be a programmable sequencer, specifically for EL wire. It has 8 channels and is Arduino compatible, meaning that it is easy for an electronics newbie like me to program and deal with.
I ordered the sequencer on the Sparkfun 'Free Day', but the lack of sufficient (read: University sized) bandwidth meant that I kept getting 404's and missed out on the free stuff and had to pay for my order :( It arrived and I got it talking as a Lilypad Arduino after soldering on pins for the FTDI cable. From there I did very little.
In June I realized how close Defcon was and that I should get to work. I layed out my design for the EL wire with string and alot of tape. This gave me the rough length for the amount of wire I needed and how much to order. It ended up being about 55 feet, plus a few extra for leader lengths inside the coat where they join to regular wire. Since it was stretchy string, I erred on the side of caution and ordered 70 feet and another inverter with the expectation I would wire up my hat or something else at some point.
To drive the EL wire, you need an inverter which takes DC power and ramps it up to the high voltage and high frequency AC current that is needed to run it. The inverter must be matched to the length of wire for maximum brightness and operation. I measured my longest segment, the back panels which were 11 feet each, the shortest was 5.5 feet on the front. This meant I was right in the zone for a 5-15 ft battery powered inverter.
The EL wire was ordered from Coolight.com as they seemed to have the best price at $1.25/ft for the 2.3mm wire in Lime Green. Shipping was expensive as usual to Canada, but there was no decent Canadian option. I could have gone and ordered off Ebay for less, but my standard policy is to have someone accountable should the order get screwed up, I know who to punch.
Also ordered from Sparkfun was a whole bunch of ancillery parts needed. LiPo battery packs, chargers, JST connector jumper wires, and other bits I would need. I could not find the JST conectors in Canada. A definate pain since at $1 each they add up. Using something a bit more common would have helped, but Sparkfun seems to really like those kind of connectors, so extras were ordered.
The cable arrived and I set to work. I nervously measured and cut my first segment and wired it up. It glowed, so I knew I did something right. The wire is a pain to work with since there are 2 layers of plastic cover that need to be removed without destroying two very, very fine wires inside, underneath the second layer. There are professional tools to do so, but I had great luck using this type of wire stripper. 9 times out of 10 it would strip the wire of both plastic layers and not destroy the wires. Strain relief is important. you can never have enough lengths and layers of heat shrink.
I wanted to have the wires run inside the coat and poke out just the EL where it needed to go. I found the best way to have that happen was to poke it in from the outside along the seams of the coat. It took some work and generous shoving and reaming with a large needle, but I was able to get both ends of the EL wire in between the stitches of the coat and looking very nice. I left about 3 inches inside the coat at both ends as a sort of strain relief and to give me a buffer in case something broke and I needed to re-connect a length.
The power system was fairly easy thanks to Diana Eng. There are 3 connectors on the board for power and the inverter; Battery, EL power and EL output. The battery powers the board obviously. EL output is for the output of the inverter. The middle connector is there to provide power to the inverter from the main LiPo battery should you not want to power it seperatly. A jumper from the ground of EL output to EL battery is nessecary, though I'm not entirely sure why.
From there it was just a matter of stitching. I used a large needle and 10lbs test fishing line to loop stitch the wire down along the seams I had laid out along with my string test earlier. Copious amounts of gaffer and Gorilla tape were used to hold the loose end of the wire down while I hand stitched it all. Gaffer tape did not leave any residue, however it was one use only for the strips, Gorilla tape held through multiple sticks but occasionally left some residue. Temperature was a big factor in this, the colder the tape was when it came off, the less residue. I learned not to pull the tape off immediatly after working on an area and handling it, but to leave it to cool off a bit I could remove it safely.
It took 3 seasons of commercial free copies of 'Mythbusters' and many, many, many hours (I'm guessing somewhere around 50) and many late nights of just repetitive stitching, soldering and taping. First I did the front upper panels across the chest. The back was next, then the two lower 'flap' panels, and then the arms. Any knots in the fishing line were touched with super glue to ensure they do not unravel. Gaffer tape was used to cover any bits that were poking me, particularly in the sleeves.
The back presented some interesting challenges since I didnt want to just frame the back and also with a partial slit up the back, it needed to be adjusted to accomedate the back at rest and closed with both sides visible. I opted to follow the 'cross' straps on the back and to loop around a D ring locate in the middle of the back. This presented additional challenge since the strap the D-ring is attached to was not put on perfectly stright on the vertical. It was a bit askew, so I opted to ignore that and follow here it should have been since the wire will be what the eye follows, not the coat straps.
The Arms also presented a challenge since I wanted to encircle the arm at some point and return to where it started, this meant that I had to go 540 deg around the arm or else I'd just go back up to where I came from. I came up with the arm design after playing with more string. It made me glad I ordered extra EL wire. It goes down the arm, at the forearm there is a seam that it follows all the way around and once back at the start, turns back down the arm to the wrist where it does a one and a half wrap around the wrist to follow the seam up the back of the arm to the shoulder where it meets back at the start. This gave the coat a more 'refined' look. Reminded me of a marching band uniform or something out of an old military coat.
Programming was simple off the start. I heavily relied on Diana Eng's MAKE magazine article on EL wire fashion. It is one of the few resources I found that uses the Sparkfun EL sequencer. I modified her code to include a 'time' variable that set the on time for each segment as it looped through.
A limitation of the Sparkfun Sequencer is that you cannot drive more than one segment at a time, however you can flash them really fast. A 1ms delay to the eye means that all segments are on 1 out of every 8ms, however it is not as bright as it could be since you are pushing the eye pretty hard to see . There is a wierd 'shimmer' that happens as segments get out of sync. 10ms is awesome as it is much like a persistance of vision device but it may also be seizure inducing after a while. The strobe effect is fun, but I did'nt want to make people vomit on my shoes.
At the HOPE (Hackers on planet earth) conference in NYC, I brought the coat out to get some help and make some repairs from transit. I also hunted down the analog inputs on the board. There are analog pins labeled on the board, however they seem to be unresponsive and I could not get them to do anything. The Sequencer was originally designed to use a RF module for input not locally wired, so I traced out that pin 14 was connected to the RF module headers and decided to use that.
At the conference I wired up a button down the sleeve to the left wrist. The idea was to use it as a button press to change the blink rate. Start at 1 or 10ms and with a button press, add 100ms up to 500ms where it would then loop back to 1 or 10ms. With the help of a very nice man named Mark from Fubar Labs helped me figure out the button press code.
Here's the code I am currently using. Note: May change as I progress. el_sequencer_v1.pde
I am still sorting out some bugs, such as when the coat is not worn, the button press behaves normally. When I am wearing it, it seems to like to randomly change. I get the feeling that with so much high voltage flying around there is a short somewhere that is tripping my button press code or some sort of debounce issue I cannot solve.
Another problem was with my choice of using fishing line. While it is strong and clear and nearly invisible at a distance, the knotted ends can poke and hurt. Gaffer tape over the knots solved this, but it's not optimal.
The Sparkfun EL Sequencer documentation is terrible. There is a great
deal missing that would be good to know on the site. I am going to
endevour to post as many as I can in the comments:
The coat will be a work in progress for a while. It was very amusing to be a tourist walking the streets of NYC and being wierder than the locals. Everyone loved the coat and I definatly will continue to add EL wire to things. At Defcon I must have had a thousand people take my picture. No siezures, but alot of people had a thousand yard stare at me as they were transfixed.
RenderMan
7/19/10